Wednesday, August 24, 2011

Competition Crazy!!!

Hello everyone, I am happy to announce that for the next two weeks I'll be participating in two competitions In New York. If the weather holds out and Hurricane Irene doesn't blow through I will join 34 other artist in a Plein Air Painting Contest hosted by The Teaching Studio.


The location of the Competition
The week after I have the honor to be chosen a second time to participate in the second annual Drawing Competition at The Grand Central Academy. Last year was intense but so much fun. I'm looking forward to meeting new artist and catching up with friends from the past event.


So wish me luck everyone and I'll make sure to post the art and events when I return. Thanks All!!!


Thursday, August 11, 2011

Sun Thickened Linseed Oil

Hello everyone, last August I thought I would try my hand at making my own Sun Thickened Linseed Oil. I started Using Sun Thickened Oil in my Mediums near the end of my studies in Florence, Italy. Although at The Angel Academy it was never suggested I use this oil. I Later discovered it useful when I started making Plein Air Paintings. Upon further researched I found out that artist such as Anthony Van Dyck and Peter Paul Rubens also implemented the use of Sun Thickened Linseed Oil.

The Oil has some characteristics of Stand Oil but dries significantly faster. I also noticed the initial adhesion is much greater than stand oil. I just love the all around variety one can produce by using Sun Thickened Linseed Oil.

Before I got started I read a few books that I thought could point me in the right direction. The Artist's Handbook by Ralph Mayer, Max Doerner's The Materials of the Artist, Parkhurst's The Painter in Oil and Oil Painting Techniques and Materials by Harold Speed all came in handy. Along with the books I found a couple of great artist blogs online that helped answer any other questions I had.

The first thing I did was buy a cheap cooking sheet and found an old piece of glass. To allow the oil to breath during the thickening I tied twine around the cooking sheet. This twine kept the glass from touching the cooking sheet at the same time protecting the oil from dew, rain water and insects.

Linseed Oil Under Glass

I merely placed the flat sheet filled with High Quality Cold-Pressed Linseed Oil out in the yard where it would receive direct sunlight most of the day. So now I play the waiting game, every couple of days I will check on it and stir the oil. I what to make sure that the oil does not skin or become thicker then what I prefer.

Sun Thickening Setup

I had read that the oil should thicken within a week or two depending on the weather. So I was a little confused that for me after three weeks not much had changed. Then I realized that I put too much oil in the sheet pan. So to remedy this I separated the oil into two sheet trays and within three days the oil rapidly thickened. I found that about 1/4inch of oil was just right. Even though it took longer I don't believe it was wasted time. All the time the oil was sitting there it was collecting air assisting to its oxidization.
Despite taking precautions to protect the oil the insects and water was almost unavoidable. One of the batches got soaked during Hurricane Irene. Nonetheless there was ways to fix that too. Before bottling  them up I filtered the oil in cheese cloth to get rid of the bugs and shrapnel. The batch with water I just left bottled in the sun until the water and oil  eventually separated.
All and all it was a great learning experience and I wound up with about three years supply of Sun-Thickened Linseed Oil. 

Painted Sketches

Hey Everyone, so I was able to take a few more photos of some of my Plein Air Sketches. These were all done quite rapidly and the purpose of these paintings were to capture the scene, mood and colors of nature. I may in the near future use these works as reference when working on larger studio paintings. We will see, in the meantime I hope that you enjoy these paintings.

Painting from N/S Lake

Another View of N/S Lake

Mountains at Platte Clove
These next paintings are of Sunsets. Every night we would gather at an overlook on a hill and try our best to capture the ever changing moments of the setting sun. Some evenings I was able to paint up to four stages of the sunsetting. Other nights I was lucky if I could pull one painting off. Each days posed a different challenge to confront, whether it be changing clouds, humidity, dust, heavy atmosphere, or last but not least those F@#*ing Bugs! I learned everything played a factor on the colors of the sunset. Although as time went on I became able to predict what color may arrive depending on the conditions of the day. This gave me an advantage in the painting because I could then begin to premix colors I thought I would see.

Sunset #1

Sunset #2
Pink Clouds
Sunset #3
 In addition to painting the sunset I also Painted with the sun to the back of me. Reverse Sunsets are very beautiful and a lot cooler in color.

Reverse #1

Reverse #2


Reverse With Moon


Tree Stump of Platte Clove


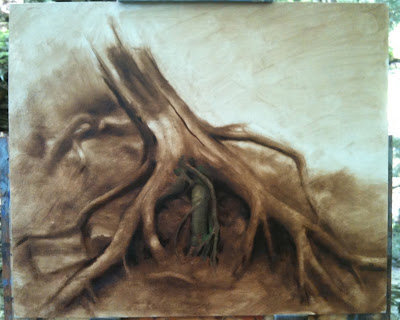
I found that I really enjoyed making paintings of forest interiors during my stay in the Catskill Mountains. I was amazed at some of these trees that grew on the ledges and cliffs near the waterfalls. Their Roots seemed to grow wrap around anything it could to sink itself into position.

Burnt Umber Wash Drawing

With this painting I started as I often do with a Burnt Umber Wash Drawing. I threw on the basic gesture of the stump and worked on articulating the smaller roots later on. 

Shaping the Wash Drawing
I drew in the stump using two brushes and Mineral Spirits. One brush contained the oil paint to put on the panel and an other clean brush with mineral spirits to carve away wet paint and shape the drawing. 

Premixing Color

I did a great deal more premixing of my pigments in this painting. I made many different varieties of brown for the roots of the tree. I made mixtures of green/brown for the sun facing parts of the tree. Yellow/brown made up much of the lighter values of the stump. I noticed that as the roots entered the ground they abruptly became a warmer red/brown. As the shape of the roots rolled and turned into the shadows the browns became very much neutral. So to save my self time and extra labor premixing became very usefully.

Applying Color

I very thoughtfully and carefully applied my color choices paying much attention to the forms I encountered. In this painting I didn't want to have to come back and repaint any of the areas a second time. I had only one afternoon to work on this painting so what ever information I could gather had to be accurate. 


As I'm painting I am constantly checking and reworking my drawing. My goal was to capture as much of a likeness without driving myself completely crazy. The one thing I noticed about working on a painting piece by piece is that I had to constantly reel myself back from rushing to the next section. Patience is definitely the key to better painting. 

Painting the Ground floor

After Painting in much of the roots the stump seemed to be floating in air. I felt at this time it was a great opportunity to put in the ground floor. I started by applying a glaze of Burnt Umber and painting into it with various mixtures of Burnt umber, Burnt Siena, Yellow Ocher and White. After sections of the ground floor where completed I could then paint green foliage springing out of the earth.

The Final Study

I had added a neutral grey to bring out the forms of the stump. If I had another day with this painting I would had loved to paint in the entire scene. As a study for some foreground element in a larger studio painting this will suffice.


Elka Park Rock and Leaf study


Hey everyone I have more work to post from my time with the Hudson River Fellowship. This time I decided to make a rock and leaf study. I pretty much set up right in the middle of a creek for this painting. My easel was in the water and I stood perched on a rock hoping not to be too careless and take a surprise swim. I choose this spot because all day it was threatening to rain and close by there was a bridge to take shelter under. This painting was originally supposed to be a grisaille study in Burnt Umber. Later as I got into the work It seemed to make more sense to paint it in full color.

The Scene of the Rock


Burnt Umber Wash-Drawing

I started the painting with a rapid wash-in drawing in Burnt Umber. This allowed me to get the general composition and placement of the subject. To shape the forms I took a clean brush dipped in mineral spirits to pull away the paint from the panel.

Pulling the Shapes of the Leaves

Reinforcing the Drawing

After pulling out the general shapes of the leaves with Mineral Spirits I continued to rework the drawing.  More carefully I went back into the painting with the Burnt Umber trying to realize the correct shapes and forms of the leaves.

The Finished Under Painting
I worked the Under Painting to the point where I felt I had enough information to guide me in the over painting. If this was to be a  gallery painting and not a study I would have spent more time in the early stage perfecting the drawing and better interpreting the tonal relationships.  

Premixing 
I spent a little bit of time premixing some of the major notes of color I saw in the rock and leaves. I don't always do this but for this I really want to control may values from getting out of hand.

First Application of Color

I really didn't have a solid plan of action on starting the color. I figured I'd start in the darker values of the rock and then see where that would take me.

Further developing the Painting

As I worked I found my direction slowly developed the painting. By starting on one section and then working on the adjacent pieces the painting started to take shape. 

More Developments  

At this stage of the painting I am still not too interested in the small details. I really wanted to focus on the major tonal and color shifts that where taking place. Once I have constructed the body of the forms I can then lay the fuzzy moss and varying edges.

Toning Shadow Areas

Transparently I applied more Burnt Umber to the areas that appeared to be cast in Shadow. I would later paint directly into this glaze to achieve a smoother transition from Light to Shadow.

Finished Lay-in of the Rock

Painting More Moss 
Along with painting the moss I started to introduce darker values into the shadows. I again painted the shadows transparently but this time using a mixture of Burnt Umber and Ultramarine Blue Deep.

The Final Study